
Recently I received a question, “Hey William, can we quickly set up a load test for a few APIs?”. After discussing the depth of the test and what the goals were, we decided to start with a simple test to see if the infrastructure could handle the load. If there was time, maybe we’d expand it with more complicated API calls.
This blog post will not go into the complicated ones. I think you’ll be able to figure that out on your own after reading how easy it is.
How did I find Locust
Since we had the infrastructure in Azure, I started looking into ‘Azure Load Testing’. I had tried that before and it worked okay, but you had to use either JMeter scripts or set up curl commands. Both of those are not things most developers get excited by…
But now they support ‘Locust’, and I must admit I had never heard of it. But it’s great!
Starting with Locust
How do you start? Simple! Let’s do the following:
- Make sure to have Python installed
- Open an empty folder in VSCode.
- Open the terminal window and type
python3 -m venv ./venvandsource ./venv/bin/activateto create and open a Python virtual environment. - Then install Locust:
pip install locust - Create a new file
locustfile.pyin the root of the folder.
Creating a simple script
Let’s start with a simple script. I’ve hosted my website locally to start load testing it on my Mac. I’ll continue writing in the comments.
# this is a slightly edited version from the Locust home page script example
import random
from locust import HttpUser, between, task
from pyquery import PyQuery

# this class represents users we are simulating
class BlogReader(HttpUser):
    host = "http://localhost:8080/"

    # Simulate user reading time on the home screen
    wait_time = between(5, 15)

    def on_start(self):
        # start by waiting so that the simulated users
        # won't all arrive at the same time
        self.wait()
        # assume all users arrive at the index page and we do this by calling the index page function
        self.index_page()
        self.urls_on_current_page = self.blog_urls

    # These are the tasks this user will execute, the number is the weight that the determines the amount the task is executed by this user
    @task(10)
    def index_page(self):
        # we open the home page
        homepage_response = self.client.get("")
        # create a query object
        query_homepage = PyQuery(homepage_response.content)
        # search for all blog items, in this case for a elements in a div  with id 'Blog'
        link_elements = query_homepage("#Blog a")
        # save all links in this div
        self.blog_urls = [
            l.attrib["href"] for l in link_elements
        ]

    @task(50)
    def load_page(self):
        url = random.choice(self.blog_urls)
        response = self.client.get(url)
We’ll need pyquery to run this script, so let’s do pip install pyquery first.
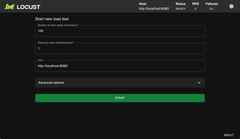
Now that we have our first script, let’s execute it with locust -f locustfile.py and click on the URL it logs in the console.
We’ll get a fancy UI that shows us which parameters we want to run with. When starting, we see several stats.
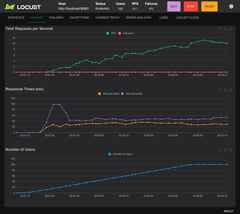
And after running for a while, we can see stats. Turns out 100 users on my local dev server is fine! ;)
Okay, now this was super simple. I’ll show a slightly more complicated script.
Authentication and Parameters
Most times you also need to authenticate and add parameters for the API calls. Let’s read through this script:
from locust import HttpUser, TaskSet, task, between
import os
import random
import requests
import datetime

# Setup the Load user, because we made a TaskSet, we can use it in startup later
class SetupAuth(TaskSet):
    def on_start(self):
        # Some global variables to authenticate with Entra ID
        self.parent.client_id = os.getenv("CLIENT_ID")
        self.parent.client_secret = os.getenv("CLIENT_SECRET")
        self.parent.tenant = os.getenv("TENANT")
        self.parent.scope = os.getenv("SCOPE")
        self.parent.username = os.getenv("USERNAME")
        self.parent.userpassword = os.getenv("USERPASSWORD")

        # Get OAuth2 token via the function for this
        # If you plan on running longer than the token validity period, you need to refresh the token as well
        self.parent.authorization_header = self.get_oauth2_token()

    def get_oauth2_token(self):
        tenant_id = self.parent.tenant_id
        client_id = self.parent.client_id
        client_secret = self.parent.client_secret
        scope = self.parent.scope

        url = f"https://login.microsoftonline.com/{tenant_id}/oauth2/v2.0/token"
        headers = {
            "Content-Type": "application/x-www-form-urlencoded"
        }
        body = {
            "client_id": client_id,
            "client_secret": client_secret,
            "grant_type": "client_credentials",
            "scope": scope
        }
        response = requests.post(url, headers=headers, data=body)
        if response.status_code == 200:
            return f"Bearer {response.json()['access_token']}"
        else:
            print(f"Failed to get access token: {response.status_code}, {response.text}")
            return None

# Setup the Load user, because we made a TaskSet, we can use it to set up the user later
class BigEater(TaskSet):
    def on_start(self):
        # Parameters we want to use for the API calls
        self.parent.pizza_ids = os.getenv("PIZZA_IDS").split(',')

        # Set up authorization header
        self.common_headers = {
            "Authorization": self.parent.authorization_header,
        }

    # And now create any API call we want
    @task(1)
    def post_pizza_order(self):
        headers = self.common_headers.copy()

        # Select a random pizza ID
        random_pizza_id = random.choice(self.parent.pizza_ids)
        # Generate a random order ID with a maximum of 30 characters
        random_id = ''.join(random.choices('ABCDEFGHIJKLMNOPQRSTUVWXYZabcdefghijklmnopqrstuvwxyz0123456789', k=30))
        # Generate the current ISO timestamp
        iso_timestamp = datetime.datetime.now(datetime.timezone.utc).strftime("%Y-%m-%dT%H:%M:%SZ")

        # Define the request body dynamically
        body = {
            "timestamp": iso_timestamp,
            "orderId": random_id,
            "pizzaId": random_pizza_id,
        }

        # Perform the POST request
        with self.client.post(
            f"/pizza/orders",
            headers=headers,
            json=body,
            catch_response=True
        ) as response:
            # I added this so we can see error messages in the log
            if response.status_code != 200:
                response.failure(f"Error {response.status_code}: {response.text}")
            else:
                response.success()

# And lets start it up, by using a HttpUser
class Starter(HttpUser):
    wait_time = between(5, 10)
    host = f"https://{os.getenv('DOMAIN')}"
    # We use the SetupAuth TaskSet to set up the user
    def on_start(self):
        SetupAuth(self).on_start()

    # We can now use the BigEater TaskSet to run the tasks
    tasks = [BigEater]
And now, within 100 rows, we have a load test that includes authentication with Azure Entra ID and allows for adding environment variables to pass a set of IDs.
Scaling Up: Running Your Locust Script in Azure Load Testing
And this is what makes this go from good to great!
The script we created and tested locally can simply be uploaded to Azure Load Testing, and we can add the parameters there directly or link a Key Vault.
Let’s try this:
1. New load test resource
Open the Azure portal & create a new Azure Load Testing resource.
2. New Test
Go to Tests in the left window and click Create > Create test (not a URL-based test).
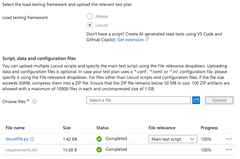
3. Upload your file
Fill in all details and, when on the Test tab, upload your Locust file.
Also upload requirements.txt if you need any packages.
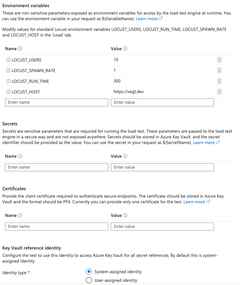
4. Parameters
Add any environment variables you need in your script on the parameters tab.
You can also just upload csv files next to your script.
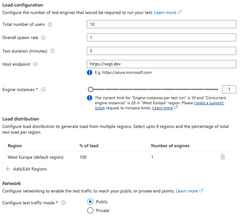
5. Load
On the Load tab, you can select the number of users, and it will suggest the number of instances.
You can have up to 400 instances by default, which is easily 200,000 users.
That can make multiple requests, of course.
Beware: let’s start with 1 instance to prevent high costs.
Also note, on the Load tab you can also run from within a VNET, which is very useful for private resources.
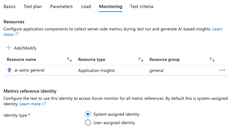
6. Extra: Azure resource monitoring
On the monitoring tab, you can add resources that you think might be impacted by this load test. Say you call something that loads a SQL-database you could add that as a resource to monitor. This will create a neatly organized overview after the test in which you can see how the test progressed against the DB resources.
Running the test
When we have the test set up, we can run it by clicking run!
You can monitor it while it’s going, and after it is done you can look into how your load test went.

I hope you learned something!
Thank you for reading this post, good luck bringing your applications to their knees!
Feel free to leave a comment below or share your own experiences!